
Chapters
- Contents1
- Description and Specifications3
- Chapter 1 - Engine8
- Data8
- Accessory removal9
- Engine disassembly10
- Crankshaft and flywheel14
- Cylinder block16
- Pistons and connecting rods21
- Camshaft and valve mechanism26
- Cylinder head and front cover30
- Oil pump30
- Water pump32
- Governor34
- Oil pan, intake and exhaust manifolds38
- Assembly of engine40
- Installation of accessories46
- Definition of fits48
- Fits and tolerances50
- Torque wrench readings51
- Carburetor52
- Servicing the starter58
- Chapter 2 - Transmission61
- Chapter 3 - Power Take-Off71
- Chapter 4 - Belt Pulley75
- Chapter 5 - Rear Axle79
- Chapter 6 - Hydraulic System89
- Chapter 7 - Steering Gear101
- Chapter 8 - Service Bulletins111
- Bulletin Attachments126
Chapter 1 - Engine
Cylinder block page 16
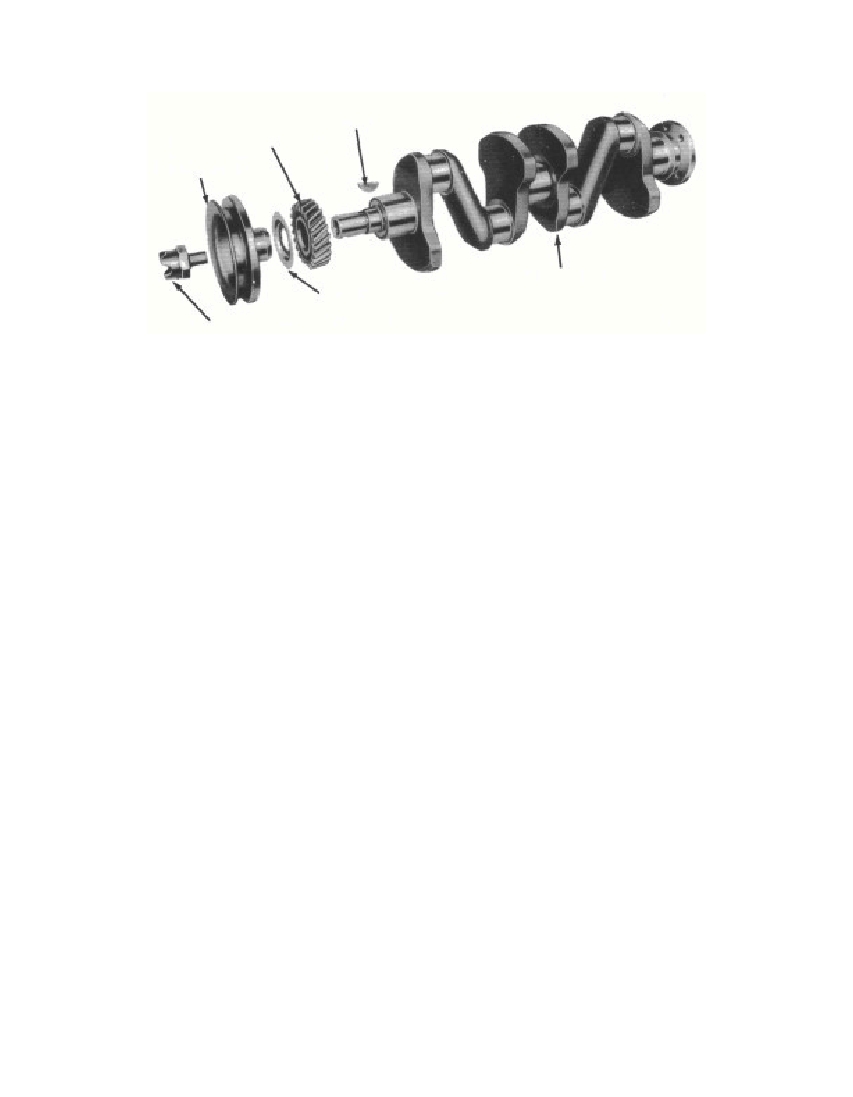 Fig. 10—Crankshaft Assembly, Disassembled(1) FLYWHEEL RING GEAR REPLACEMENT. Drill a 17/32-inch hole nearly through the flywheel ring gear on the engine sideof the gear. Split the ring gear at the drilled hole with a chisel,and lift the ring gear off the flywheel. Clean the ring gear recess onthe flywheel. Heat the ring gear evenly to 360° F., and place it onthe cold flywheel, making sure it is seated in the recess of the flywheel.(2) REFACE FLYWHEEL. Remove just enough material fromthe clutch friction surface to obtain a smooth, flat surface parallelwith the flywheel mounting flange. The same amount of materialmust also be removed from that portion of the flywheel to whichthe clutch pressure plate is attached. If the thickness of the fly-wheel, measured between the friction surface and the flywheel mount-ing flange, is reduced to less than 0.855 inch in order to obtain asmooth, flat, surface, the flywheel must be discarded.(3) CLUTCH PILOT BEARING REPLACEMENT. Drive thepilot bearing out of the flywheel. Install the pilot bearing into theflywheel with a fiber block or a rawhide hammer (fig. 11).122. CYLINDER BLOCK.Strip off the old gaskets from all the surfaces of the cylinder block.Remove the oil passage plugs from the front and rear of the cylinderblock, and clean all oil passages in the cylinder block with steam orcompressed air. Scrape all of the carbon from the cylinder block.a. Inspection and Repair. If the valve springs in the cylinderblock are corroded or rusted or if there is an excessive amount ofsludge in the valve chamber, it is an indication that the cylinder§ 122. a.3695-4716WOODRUFF KEYCRANKSHAFT GEAR—6306CRANKSHAFTPULLEY—6312CRANKSHAFT RATCHET—6319OIL SUNGER-6310CRANKSHAFT—6303RM-585
Free to read online. Contents · Where is the serial number on a 9N, 2N or 8N?