
Chapters
- Contents1
- Description and Specifications3
- Chapter 1 - Engine8
- Data8
- Accessory removal9
- Engine disassembly10
- Crankshaft and flywheel14
- Cylinder block16
- Pistons and connecting rods21
- Camshaft and valve mechanism26
- Cylinder head and front cover30
- Oil pump30
- Water pump32
- Governor34
- Oil pan, intake and exhaust manifolds38
- Assembly of engine40
- Installation of accessories46
- Definition of fits48
- Fits and tolerances50
- Torque wrench readings51
- Carburetor52
- Servicing the starter58
- Chapter 2 - Transmission61
- Chapter 3 - Power Take-Off71
- Chapter 4 - Belt Pulley75
- Chapter 5 - Rear Axle79
- Chapter 6 - Hydraulic System89
- Chapter 7 - Steering Gear101
- Chapter 8 - Service Bulletins111
- Bulletin Attachments126
Chapter 1 - Engine
Servicing the starter page 59
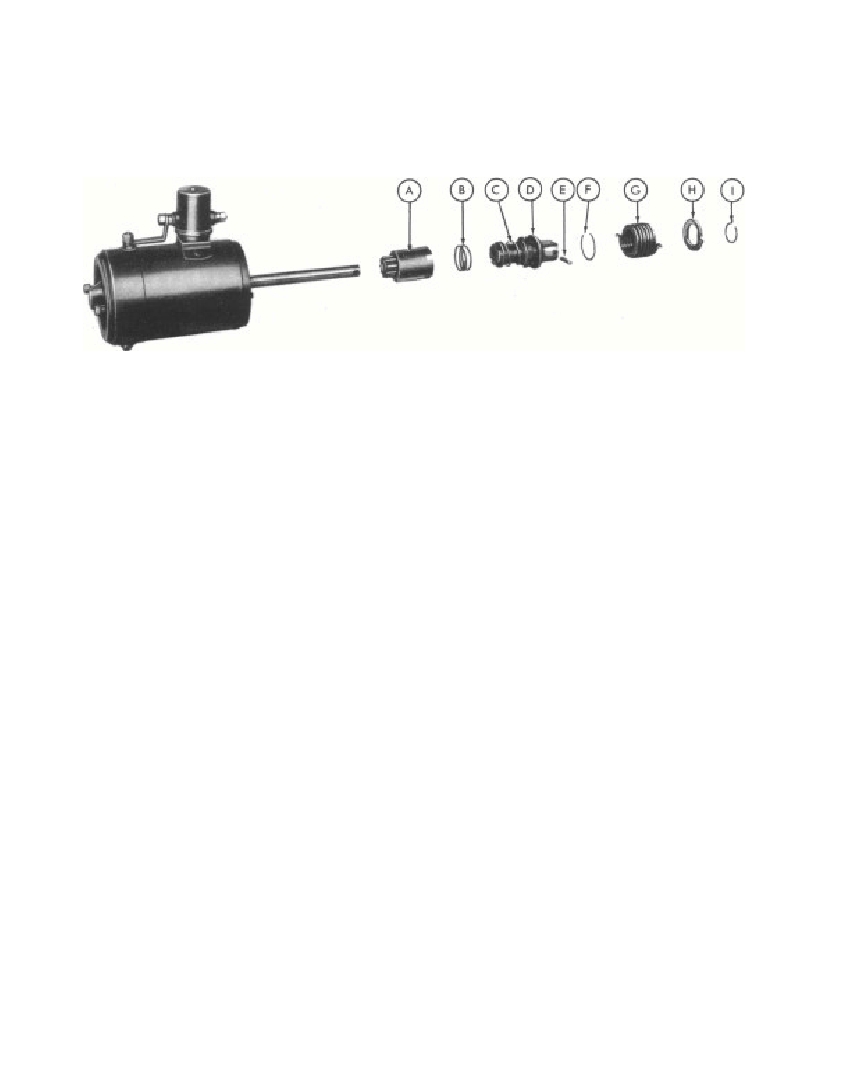 SERVICING THE STARTERFig. 2up the dowel hole with the dowel hole inthe starter case.Step 2—Hold the brushes up in the brackets bypositioning the spring clips on the side ofthe brush.Step 3—Connect the two ground brush leads tothe case.Step 4—Install the armature and bendix assemblyin the case.NOTE: Make sure the fibre washer is on the endof the armature shaft.Step S—Install the two long bolts.Step 6—Push the brushes down on the commutatorwith a small screwdriver through thestarter case band opening.Step 7—Install the starter case band.V. DISASSEMBLING THE BENDIXStep 1—Remove the lock spring (I-Figure 2).Step 2—Remove the starter spring anchor plate(H-Figure 2).Step 3—Remove the bendix spring (G-Figure 2).Step 4—Remove the spring clip (F-Figure 2), andthe starter spring anchor plate (D-Fig-ure 2).Step 5—Remove the pin (E-Figure 2) that se-cures the bendix assembly to the shaft.Step 6—Remove the screw and shaft assembly(C-Figure 2).Step 7—Remove the starter drive meshing spring(B-Figure 2).Step 8—Remove the pinion and barrel assembly(A-Figure 2).VI. ASSEMBLING THE BENDIXReverse the procedure in Steps 1 through 8,Part V, of this Job Plan.VII. INSTALLING THE STARTER ON THE TRACTORStep 1—Position the starter assembly on thetractor engine.Step 2—Tighten the two bolts that secure thestarter to the engine.Step 3—Connect the electrical leads.NOTE: At conclusion of Job 19:a. Remove the engine lift plate.b. Check the spark plug gaps and installspark plugs.c. Install the wiring harness.d. Install the battery box and air cleaner.e. Install the tool box.f. Install the battery and battery boxcover.g. Install the fan.h. Install the radiator,i. Install the hood.59
Free to read online. Contents · Where is the serial number on a 9N, 2N or 8N?